Monday, December 28, 2009

The Measuring Gremlin Strikes Again

We hope everyone survived the holiday season so far and wish everyone a great 2010! Within the next few posts we should have the blog caught up to our current progress and be able to update you with the very latest progress inside the studio.

After Pinball Expo we spent a lot of time thinking about our future plans and about the business side of it all - or even if there would be a business side of it all. We connected with a great group of people after the show and started talking in terms of how to go about moving this idea from the original "one-off" approach to a potential limited series; much like the world of fine art. Gathering opinions from different sources started making our combined heads spin in a different direction than they are used to spinning so we made sure to get back to the task at hand and keep our combined noses to the design grindstone. (BTW - I actually had a summer job in my college days whereby I worked 9-5 at an actual grindstone but fortunately my nose never made contact - but my knuckles sure did.)

Dennis figured out the original problem with the backbox measurements and corrected them just after Expo. However, when going to the next step of attaching the backbox to the main cabinet, the measuring gremlin that haunted Dennis' shop stepped in again, and the hole that was cut to allow wires and cables to pass from backbox to cabinet was cut too large. Dennis called me to vent his frustration but inadvertantly came up with our first "notable quotable" for the project when he said (paraphrasing for a wider audience):

"Oh well, tomorrow I'll fix what I f'd-up today."

I told him we now have a great "hook" for a country song and have since trademarked the line and started writing more lyrics.

Dennis placed the new backbox on the cabinet and called me out for a milestone review. We also invited our good friend and colleague, Roger Sharpe, out to the studio for his impressions since we didn't get to talk to him much at Expo. For those readers that may not be familiar with the people of pinball, Roger is a major league pinball historian, player, designer, author, license magnet and negotiator, and we value his opinions on all subjects related to pinball.


By this point Dennis had also made progress on the front trim of the main cabinet and filled holes in both the front and coin-door area. We discussed locations for the start button and how we would decal the front of the game. The photo below also shows the maple lock-down handrail that Dennis created but still had to figure out how to make it work with the lock-down mechanism inside the main cabinet. We also discussed the best location for the flipper buttons with Roger.


We had a great conversation with Roger and he offered up some great opinions and ideas to help move our ideas forward.

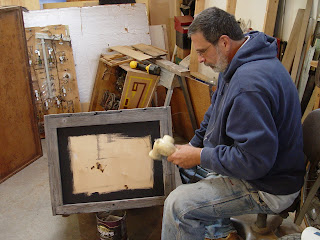
Dennis next had to tackle some of the more hidden inner-workings of the cabinet including the lock-down mechanism and the re-routed ball lift channel. But in order to accomplish this he had to order a special router bit. He also further defined the insert panel inside the backbox after we made some larger decisions about the overall direction of the game.

More to come. Happy New Year!

G & D

Friday, December 18, 2009

Pinball Expo and Beyond

Dennis was moving quickly to finalize the backbox design of the cabinet for the deadline called Pinball Expo. When I drove out to his studio to apply the new base cabinet decals, I got a preview of the backbox after Dennis had just finished putting the framework together. It was sitting on his work bench with clamps holding some newly glued pieces together when Dennis mentioned something about the box not sitting right. I was excited about the new decals and wanted to get them mounted on the cabinet so I wasn't too concerned about his comment. And even Dennis was easily distracted with the rest of the job I came there to do.


I reworked the initial comp of the title design I had started by adding more crate label influences like extra typography appropriate to our theme. At some point in early October I called Dennis and asked if we could change one word in the title - from "Sweet" to "Big". Done! That was easy.

I also worked up a composite of a group of cantaloupes to create the look of a full crate of melons viewed through the slats. I worked quickly just to get something representative on the cabinet to better "sell" the idea to the first time viewer. Eventually, I will rework the art to create a better and hopefully less repetitive illusion - this version is one "slat opening" of art.


I then repeated the strip several times and got it printed.


After cutting the strips apart I decided to flip each piece to help randomize the look. It was at this point that we noticed some measuring issues when applying the cut labels and decided to paint the wood black around the edges to make up for the slightly short decals.


But once we finished, the newly dressed-up-and-somewhere-to-go base crate gave us a new sense of accomplishment. Unfortunately these measuring issues began to haunt the studio.


The next day I got a call from Dennis. His tone was a bit off. Seems he had some measuring issues with the backbox and there was not enough time to start over and get the piece done for Expo. So we went with the show business adage, "the show must go on", and decided the half-built cabinet was enough to help bolster our Powerpoint presentation and give everyone a glimpse of our overall direction. Plus, no matter how you slice it (or cut the wood in this case), it's all still a work-in-progress.

I finished the powerpoint presentation for both of our Expo "shows" and went back to Dennis' place a couple days before the show to go over the presentation and add any last minute details. Before I left we reveiwed our visual progress out in the shop and decided to put the existing Continental Cafe backbox on top of our recently completed work of art just to help bridge our own vision by a small degree. It worked! It started looking like a pinball machine made from a bunch of crates. But we decided not to confuse the audience with this mix of style - we would only show the bottom two pieces and leave the old backbox at home.


Side note: At this point I wasn't completely sold on the 2x4 providing the angle for the game cabinet. I thought it should have more "character" built into the device. I suggested to Dennis that maybe the "guy" that put this thing together from his old crate collection was looking for the magic device to create the perfect angle - maybe something a bit more 'adjustable'. Like maybe when he finished his can of beer, and after stomping on it, it dawned on him that this was the angle adjustment he was looking for! Dennis grabbed a couple cans from the recycling bin, stomped on them, and the result is evident in the above photo. Is it a keeper idea? Well, the crushed cans didn't make it to the show.


Agreeing to show our project at Pinball Expo 2009 was probably one of the best decisions we've made so far. It gave us a real deadline to shoot for and we couldn't have been more pleased with the overall response we got from the attendees. Of course there were a few "I don't get it" style comments but most everyone seems genuinely interested in Big Juicy Melons.

The Whoa Nellie work-in-progress opened up communication with a lot of folks that we may never have had a chance to meet without the project. Dennis and I had no idea of what type of reaction we'd get from the actual presentation but it turned out well. However, just before we went up to start the presentation, Wayne Neyens, the Gottlieb game designer that actually designed "Continental Cafe" (among countless other great games) walked in and took a seat in the audience. His presence turned up the anxiety dial a few notches not knowing how he'd react to a couple of punks like us "frankensteining" his original work. Fortunately, Mr. Neyens has a great sense of humor and came up after to take a closer look. He smiled and wished us luck! (Someday we'll post a picture of this moment if we ever find the photographer - maybe it will be in the next issue of Pingame Journal??)

We spent the rest of the weekend talking,and talking,and talking - but it was all good and very productive. We went home exhausted but happy knowing that a good number of people were "on board" with this idea. We came away with new ideas, a sense of direction, and plenty of contacts for printing and other related support.

I created a poster exclusive for Expo and sold it for a modest price to help raise some capital for our, so far, out-of-pocket venture. We only printed 100 11x17 posters. We sold about 25 posters so if you already own one it's now even more collectible as we will cut off the "Expo" related portion for future sales of the remaining posters.

The remaining posters will look like this (13 x 10.75"):


If you are interested in owning an early piece of the Big Juicy Melon project with an autographed copy of this limited supply poster please email us at whizbangpin@comcast.net and we'll work out the details for shipping and payment.

Next time we'll continue with the rest of the backbox story and the continued haunting of D's studio that led to the new "notable quotable".

Oh, and one other interesting side note. In July I celebrated yet another birthday with my family at a local Chinese restaurant. When I opened the fortune cookie I read this message:


I went home and taped the fortune to my calendar and counted three months ahead...and I landed on the day we ended up debuting the Whoa Nellie project! It's all good!

We want to thank Rob and Mike again for a great 25th anniversary Pinball Expo and giving us the opportunity to preview "Project X" and leaving it on the show floor for all to see. And thanks to Jerry and Mark for all the help we received getting the project into the building under wraps for the big debut. And thanks to all the folks that chatted with us and provided the needed support to continue with our plans.

Now get back to shopping...and hurry,
G & D

All art, sketches, or photos related directly to "Whizbang Pinball" or "Whoa Nellie (Brand) Big Juicy Melons" or "Whoa Nellie (Brand) Sweet Juicy Melons" are TM and Copyright 2009 WhizBang Pinball, Greg Freres, and Dennis Nordman.

All photos in this post by G. Freres

Friday, December 11, 2009

In the meantime...Art Start

Dennis could begin to see the finish line approaching as Pinball Expo was about one week away when he started to build the backbox. Even though there were other details of the cabinet that needed to be addressed we felt that with the backbox completed, we'd have a good portion of Dennis' vision for the cabinet represented at Expo.

While Dennis was cranking the summer away on the cabinet, I had spent some time working on a backglass sketch starting at the end of August and began working on the title design for the Whoa Nellie brand. Based on my research of fruit crate labels I had a good idea for the direction I would take regarding the design of the letter forms and I ended up designing a piece that was a good starting point. I sent it to Dennis to get his take on it.


Dennis was happy with this initial direction and reminded me that fruit labels were full of all sorts of lettering...along with the company name there are distributors, locations, the kind of fruit or vegetables, quality marks, packers, years in the business and other elements that fill much of the label with words. This allowed us to have some fun with these types of elements and gave me more room for creativity.

I really didn't want to go to expo without representing the art "department" so I continued to refine what started as a title design into something that could be used for the front label of the base crate.

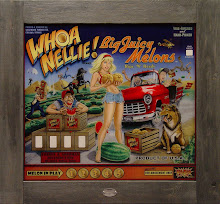
At the same time I had some initial ideas for the backglass going. Knowing all of the above direction from Dennis would play into the backglass design as well I started by looking at the key elements of the art - the title (all of it), the pin-up girl (I call her Nellie), and the cool stake bed truck. I still wanted to capture the feel of a retro-backglass but based on the design principles of crate labels.


At this point I paid some amount of attention to the Continental Cafe layout, especially for the locations of the hidden copy on the original backglass, but more as a placeholder for future reference. I used rectangles to represent an approximate location for the score reels. My first pass of Nellie was just that, a first pass. I wasn't at all happy with her face but you gotta start somewhere. She needed to be...sweeter. But I was happy with the initial sketches for the stake bed truck and started to give it some personality of its own. And the driver was the beginning of my take on Roy Parker's cast of happy background characters.


As you can see this initial sketch added a new energy to our overall direction and the excitement of working on pinball started to sink in once again. I set the backglass aside and went back to keeping up with other design work in my new freelance career.

With a backglass sketch started, Dennis began to look into the backbox and specifically the insert panel (the piece of wood that holds the score reels and the lights to illuminate the backglass). He called to let me know that it would be possible to move some elements around slightly if needed to achieve a better layout for the art. To a pinball artist these words are similar to..."Son, here's your brand new pony."


Ok, so I exaggerate once in a while. BUT, back in the day, when the backglass was still based on score reels or digital displays scattered throughout the backglass layout, causing shadow areas that we had to design around and create an "opaque screen" to help hide these shadows, and there was no talk about moving things because these were 'standard' locations for production, then you can begin to see how a designer telling me that I could move stuff around to suit my aesthetic needs...damn near a new pony in my book! It's the little things in life...right?

So we got off-track slightly to give you some insight to the start of art, but next time we'll continue with getting the cabinet ready for Expo and share our first "Notable Quotable" from the project.

Stay warm.

G & D

All art, sketches, or photos related directly to "Whizbang Pinball" or "Whoa Nellie (Brand) Big Juicy Melons" or "Whoa Nellie (Brand) Sweet Juicy Melons" are TM and Copyright 2009 WhizBang Pinball, Greg Freres, and Dennis Nordman.

Pony Photo courtesy stock.xchng

"Driver 1" (funny picture) by A. Freres

Sunday, December 6, 2009

Reconstructive Surgery - The First Step

After Dennis finished the sketch for the new "stack-o-crates" configuration, he thought about doing a small scale mock-up that we could take to the Pinball Expo in mid-October and unveil our idea to the "world". I called Rob Berk, organizer of the Expo, and asked if there were any time slots available for a short presentation regarding a project we wanted to share with the attendees. We had already agreed to do a presentation on our combined projects from our days at Bally and Williams, something that Rob titled "Evolution of the Party Animals", so we weren't sure if people would show up to a separate talk by the same two guys. Rob graciously agreed and gave us a spot on Friday evening and decided to title it, "The Unveiling of Project X". We now had a deadline and Dennis immediately upped the ante by deciding to get the reconstructed cabinet completed for the show!

Dennis describes the the steps he took in his own words:

When I did the cabinet sketch, I eliminated the standard legs and made a crate for the base. The idea was to give the cabinet a look of stacked up fruit crates and I felt that eliminating the legs was the perfect way to create the beginning of a really unique profile.


At first, the base cabinet had solid walls but Greg suggested adding slats with openings so he could add melon art to make the crate look like it was full of melons - a great idea!

I built the base cabinet using ¾ inch plywood to provide stability and mounted the original leg levelers to the bottom. I added a frame and slats on the sides to give it that crate look. We used actual crate labels for mock-up purposes only until Greg could provide his own version of labels for the Whoa Nellie Brand.


I distressed this crate the same way I did the main cabinet (See below). We wanted this crate to look different from the main cabinet for aesthetic variety. Instead of staining, I gave it a wash of light and medium grey latex paint. When that was dry, I gave it a wash of black latex paint and immediately rubbed it off with a towel. This "wipe" process highlighted all the cracks and crevices adding to the weathered look I wanted to achieve.


The main cabinet of the Continental Cafe game is slanted on the top, from back to front (like all pingames). But I wanted the cabinet to be ‘square’ like most crates. With the cabinet flat on top, there were two ways to provide the proper angle for the playfield. One was to drop the front of the playfield 3.5 degrees into the cabinet. The other way was to keep the playfield parallel with the top of the cabinet, and raise the back of the cabinet from underneath to obtain the 3.5 degrees. I decided I liked the look of the back of the cabinet being propped up by an old 2x4 - it adds an element of 'local authenticity' - like somebody built a pinball machine from a pile of fruit crates.

My first step was to pull everything out of the cabinet and take lots of pictures so I could get it all back together again. I also pulled out the rear glass support and playfield stop cross-piece. After I cut off the angled part of the cabinet I’d have to re-position this cross-piece later in the process.


(Note: The above photo represents the reconstructed cross-piece.)
I took a lot of measurements and decided I could make the main cabinet a little thinner for better visual proportions. I clamped some guide boards for the saw to the cabinet parallel to the bottom and cut off the top angled portion of the cabinet. Then I hand chiseled new grooves in the cabinet to remount the glass and playfield stop cross- piece. When I got done, I thought the cabinet looked pretty good.

It was then that I realized that I had paid no attention to the ball serve channel routed into the side of the cabinet. (For the unfamiliar, when these games were made, the ball serve mechanism was not automated - the player pushed a rod forward that would lift the ball to the top of the playfield in front of the plunger.) I had cut off the top quarter of the channel meaning I’d have to re-position and re-rout a new channel.


At this point it was time to remove the paint from the outside of the cabinet. (Although now I think this step was not necessary.) I could strip it or I could sand it. I’ve stripped lots of furniture and it’s a pretty messy process. It was a nice day so I decided to sand it outdoors in my driveway. There was a slight breeze so all the sawdust would blow into my neighbor’s yard. Perfect conditions! I plugged in my random-orbital sander and got to work.


After that was done, I started cutting the frame work for the crate. The 1.5 by .75 boards were cut from some cedar lumber I had saved from an old deck. After the pieces were cut to the proper length I started to distress them to look like an old crate. There is a gravel area near my shop and I placed the boards on the ground and jumped, stomped, and kicked them around to create random dents and scratches.

(Note: We apologize for not documenting the above, possibly very entertaining part of the process.)


I then used a propane torch to lightly burn the wood strips to help add to the illusion of aged wood and then scrubbed the strips with a wire brush to leave raised grain. This gives the appearance of a nice worn and weathered look.


The final step was to wipe on a walnut stain to darken the wood. I glued and nailed the strips to the cabinet and it began to take shape. I also had to cut a channel in the two pieces that go on the top of the cabinet to create a channel for the glass to slide in.


I asked Greg to get full-size prints made of the label art that we borrowed for mock-up purposes only, and we had a label day at my shop. The vision I had from my original sketch began to live in the real world and we started to get really excited about the future of this project.


(Note: The above base cabinet is before Dennis added the slats to the sides. Also note the all-important angle-providing 2x4.)

Unfortunately, I began to run out of time to get the entire cabinet completed for Pinball Expo 2009. While Greg worked on a backglass layout, title design, and label art for the base cabinet, I continued to make as much progress on the rest of the cabinet as I could. I still had to figure out how to rework the lockdown bar at the front of the cabinet to work with the rest of the design aesthetic, design and build the backbox and get the insert panel updated so Greg could work on backglass layout progress, and figure out how to finish the front of the playfield cabinet and coin door area.


Next: Prepping for Pinball Expo and further cabinet progress.

Photos by G. Freres and D. Nordman
Continental Cafe flyer courtesy of IPDB.com
Fruit crate labels (used for presentation mock-up only), Western Hoe and Best Point, found on various websites.

Sunday, November 29, 2009

A Trip to the Game Doctor

Now that we had the theme of "Whoa Nellie!" firmly established we began to think in terms of getting the Continental Cafe game checked out by a local electro-mechanical (EM) expert to make sure the plans we had for the game made sense. We didn't want to get too far ahead of ourselves and find out that using this game was going to be problematic in any way.

As we mentioned previously, Dennis bought the game in 2006 after seeing it at the art museum show in downstate Mt. Vernon, Illinois from local collectors Marvin and Jeff Giesting. Cosmetically the game was in great shape, including the backglass, but the game needed some work to get it back in playable condition. Unfortunately, when the game was delivered to Dennis, a mishap occurred in transit and the near mint condition backglass arrived broken into two pieces. Both Marvin and Jeff felt horrible about the glass and offered Dennis a discounted price for the game - a great example of the type of folks involved in the hobby of collecting pinball games. Dennis appreciated the generous offer and hoped he could find another backglass of similar quality. But who would have guessed that a few years later, the original backglass would no longer be needed.


After having stored the game since 2006, and never having spent any time with electro-mechanical games previous to this purchase, Dennis contacted Team EM, a group of pinball enthusiasts that specialize in EM games for some serious help. The closest team member geographically was Ken Walker so Dennis gave him a call to find out if he was interested in helping us look into the viability of the game. Ken agreed and we made a trip to his house with the CC game in the back of Dennis' pick-up.


Ken spent a good two hours with the game on a beautiful late summer afternoon on the patio in his backyard. After a brief overview of the game to help familiarize himself with the general condition, the game refused to start after we plugged it in so Ken started to diagnose the system to find the problem. As he moved through the game Ken explained to us the finer points of how an EM game works as he poked and prodded at different parts of the aging inner workings.


Dennis and I absorbed what we could from Ken's session, like a couple of dogs listening to human speech we were only understanding every fifth word or so, and soon realized that in the long run this step in the process was best left to the experts. I had never felt more comfortable or useful in my role as dedicated photographer.


One of the most interesting things we learned about these old games was the unusual method for turning them off. We found this label inside the cabinet and asked Ken to explain. Instead of an "off" switch all you have to do is kick the underside of the game and it will turn off. Apparently the fiction of the way Arthur Fonzarelli turned on or off the jukebox on Happy Days was based on some fact.


In a short period of time, Ken found the first suspect switch, adjusted it, and the game came to life for the first time since 2006. The lights were on, the flippers clacked and the bells dinged. He continued to inspect all apects of the game and in no time we were able to start playing.


I'm always amazed by mechanical aptitude because I believe I have a genetic flaw that prevents me from understanding how things work. Many people say, when it comes to art, they can't even draw a stick figure but put me in front of anything mechanical or electrical and what good is my stick figure? "Hey Stick, my car won't start...got any ideas?" I've spent many years around pinball machines but unfortunately I still have to call someone for almost any repairs.

After Ken finished his work, we packed the game back in the truck, thanked him for his guidance and expertise, and asked if he'd be available for future repair or diagnostics on an as-needed basis. Again he agreed to help us with any and all aspects of our project (he must have seen the lost look on our face during his diagnostic session). To show Ken the respect he deserves, here's a stick figure version of a new character I call..."Dr. Ken Walker, E-MD." Thanks again Ken!


In the next episode, Dennis begins the deconstruction and reconstruction process of Continental Cafe - the first step toward its new life as "Whoa Nellie! Big Juicy Melons".


All Photos on this post by G.Freres
Continental Cafe - Artwork by Roy Parker, Game Design by Wayne Neyens